On your Godot project settings, go to "display/window/stretch/mode" and select "viewport", example below:
Programming log for the ps vita. Goals: In general, make homebrew for the ps vita ; Make a hockey game.
Tuesday, January 30, 2024
Godot Resize
On your Godot project settings, go to "display/window/stretch/mode" and select "viewport", example below:
Saturday, January 27, 2024
For the Puck
As you can see, the cast is masked to work only with the puck layer to avoid any confussion with the ground later. The raycast, in charge of this, is called "forThePuck", and it has the enable option checked, with bodies but not areas.
Once we've done that, it's time to make a sanity check before going all out with the puck control and shooting:
[The script below is only printing text to evaluate both situations, but we'll change that with proper methods in the next steps.]
```
extends RigidBody
# https://docs.godotengine.org/en/3.5/tutorials/physics/rigid_body.html
onready var raycast = get_node("RayCast") # collision layer 1, like anything else
onready var forThePuck = get_node("ForThePuck") # collision layer 2, only the puck
onready var hasPuck = false
func _integrate_forces(_state):
var dir = Vector3()
dir.x = Input.get_action_strength("ui_left") - Input.get_action_strength("ui_right")
dir.z = Input.get_action_strength("ui_up") - Input.get_action_strength("ui_down")
apply_central_impulse(dir.normalized() /10)
# Jumping code.
if on_ground() and Input.is_action_pressed("jump"):
apply_central_impulse(Vector3(0,1,0))
# Grab puck control
if puck_on_sight() and !hasPuck:
get_node("Label").text = "goal"
hasPuck = true
if !puck_on_sight():
get_node("Label").text = ""
hasPuck = false
# Test if there is a body below the player.
func on_ground():
if raycast.is_colliding():
return true
# Test if the puck is on sight
func puck_on_sight():
if forThePuck.is_colliding():
return true
```
Besisdes, we're going to change the code to display the direction of the player's movement, we had done that in the vehicle node and script.
This is better and less "hacky":
[Warning: the vehicle node wasn't really needed. We'll be cleaning that when we have the puck control done. Now, this new method (code), however, is valid for both.]
```
extends VehicleBody
# Hacky way to make the character look at directions without breaking movement
# Called when the node enters the scene tree for the first time.
func _ready():
.get_node("WheelRequired").disabled = true
set_disable_scale(true)
func _integrate_forces(state):
var dir = Vector3()
dir.x = Input.get_action_strength("ui_left") - Input.get_action_strength("ui_right")
dir.z = Input.get_action_strength("ui_up") - Input.get_action_strength("ui_down")
# look at aiming direction properly / still needs a few touches
look_at_from_position(get_global_transform().origin, dir , Vector3.UP)
```
Tuesday, January 23, 2024
Dungeons and Godots
I made a character sheet for role playing games as a way to practice the GUI elements and to learn some parameters of the DnD sheet. I'm going to write below a few things to have into account when creating this kind of things in Godot, and also, for tips in some common mistakes that break projects and whose solutions are a nightmare to find, even when they are so simple.
To use a downloaded font (from PC) in TTF or any other format, create a new resource
https://forum.godotengine.org/t/how-do-you-bring-fonts-into-godot-3-0/29601/4
- Copy your TTF into your project folder
- You will see Godot import it as a
DynamicFontDatain the file browser - In the inspector click on the “new resource” icon and create a new
DynamicFont. - In the
Fontcategory, click onFont dataand choose your TTF - Save the DynamicFont under the name you want (optional)
- You can now use this dynamic font where you want, change its size, spacing etc (without altering the original font).
```
extends CheckButton
var show = false
func _on_VerTablaModificadores_toggled(_button_pressed):
$Tabla.visible = !show # Muestra o esconde la tabla segun la variable
show = !show # Actualiza la variable acorde a la visibilidad de la imagen en pantalla
```
Use the signals in that node to make it work,
# Size: x400 y500
# Pos: x540 y20
# Declare member variables here. Examples:
onready var especie = get_parent().get_node("ClaseEspecie/Especie")
# Called when the node enters the scene tree for the first time.
func _ready():
pass # Replace with function body.
# Called every frame. 'delta' is the elapsed time since the previous frame.
func _process(_delta):
var selectedID = especie.get_selected_id()
var ilustracion = "Ilustraciones/" + especie.get_item_text(selectedID) + ".png"
texture = load(ilustracion)
Tuesday, January 16, 2024
SaveData Godot
We have a few entries about Godot, now we can learn about how to save/load configuration and data for our games/apps. Besides, I will leave a link to a debug demo in GitHub at the bottom of this entry for those who want to test things.
First, we need to have a scene for loading/saving data. Since we talked about that in previous entries, I will write briefly what you need to have done previously, but I won't go into details:
- A scene: saveLoad.tscn, to work on.
- background, to look cool. (this is optional)
- a nice BGM. (this is optional)
- a character sprite to move, we'll use its position for save/loading tests.
- a nice font, to print the position in screen. (you can omit this if you want to)
Once we have this, image below, we can start with our saveLoad steps.
For making this configuration, we are going to use this documentation: https://docs.godotengine.org/en/3.5/classes/class_configfile.html
Besides, we are basing our code in this video's example:
https://youtu.be/ygGaN1EOQEA?si=9BA3dC4FbtPyKojW
Now, we'll create a new script (saveConfig.gd) to make the save system separately, so we can use it globally and in any project.
For it to be accessed globally as a singleton, you have to go to:
Project > Projects settings
Here you have to go to the autoload label and then click folder icon to load your newly created script (saveConfig.gd).
Then, click on add
to see something like this
After that, it's time to write the code to handle the file where we are going to storage the data to save-load.
```
extends Node2D
var savePath = "res://SaveLoad_test/SaveState.cfg"
var conf = ConfigFile.new()
var loadResult = conf.load(savePath)
# Called when the node enters the scene tree for the first time.
func _ready():
pass # Replace with function body.
func saveValue(section,key, savedData):
conf.set_value(section,key,savedData)
conf.save(savePath)
func loadValue(section,key, savedData):
savedData = conf.get_value(section,key,savedData)
```
With the config code, we need the game to communicate with it to exchange the data. This is done within the game scene script.
```
extends Node2D
var ghostPos = Vector2(0,0)
func _physics_process(_delta):
if Input.is_action_pressed("ui_start"):
get_tree().change_scene("res://os_test.tscn")
if Input.is_action_pressed("ui_loadButton"):
SaveConfig.loadValue("values","ValueOne", ghostPos)
get_node("KinematicBody2D").set_position(ghostPos)
if Input.is_action_pressed("ui_saveButton"):
ghostPos = get_node("KinematicBody2D").get_global_transform().origin
SaveConfig.saveValue("values","ValueOne", ghostPos)
```
With that, you have a saving system done. Since the position saving uses a global variable, it needs a few fixes, but you get the idea, and this is enough for a testing scene.
Finally, as I said at the beginning of the entry, here's the GitHub with the full project:
https://github.com/Bunkai9448/GodotVitaSystemTest
Besides, if you go to the release page, you can try the current beta on your PS Vita.
Monday, January 15, 2024
Godot Audio
In the previous entry we learn about the HUI and GUI, now it's time to add sounds. Godot's documentation for audio can be found here: https://docs.godotengine.org/en/3.5/classes/class_audiostreamplayer.html#class-audiostreamplayer However, as always, I wanted an easy example to work on...
Since I mentioned https://godotengine.org/asset-library/asset/677 in the previous entry, I will be using those as the base for this example, but you can do the same in a clean new project without problems.
First you need to create an AudioStreamPlayer node (you will likely want it to be a child of a main node
to have modularity for future sounds). After that, go to your inspector panel and load your audio:
To do that, use Stream load (image below)
Once we have the node created and the audio load, it's time to create the script to work with. Attach/Create a script in the AudioStreamPlayer's parent node to control the reproduction. Don't worry about the code in this step, we'll do it later.
After that, it's time to make or repurpose a button to play the music. In this sample, we are repurposing the previous ChangeWindowTitle button (since those are values we don't see in the ps vita).
[If you are doing this in a new project, just create a node button and do this step using that button instead]
Go to the node's panel and connect (edit in our case):
Now select the node we have created for the audio, with the script (AudioTest in the image below):
Hint: You can change the name of the signal function, here we've used the old one to make it easier to follow.
The next step is writing the code for it:
```
extends Node
func _ready():
pass # Replace with function body.
func _on_ChangeWindowTitle_pressed():
if !$AudioStreamPlayer.playing:
$AudioStreamPlayer.play()
else:
$AudioStreamPlayer.stop()
```
And that's all for today.
Sunday, January 14, 2024
Godots HUI and GUI
Human User Interface and Guide User Interface.
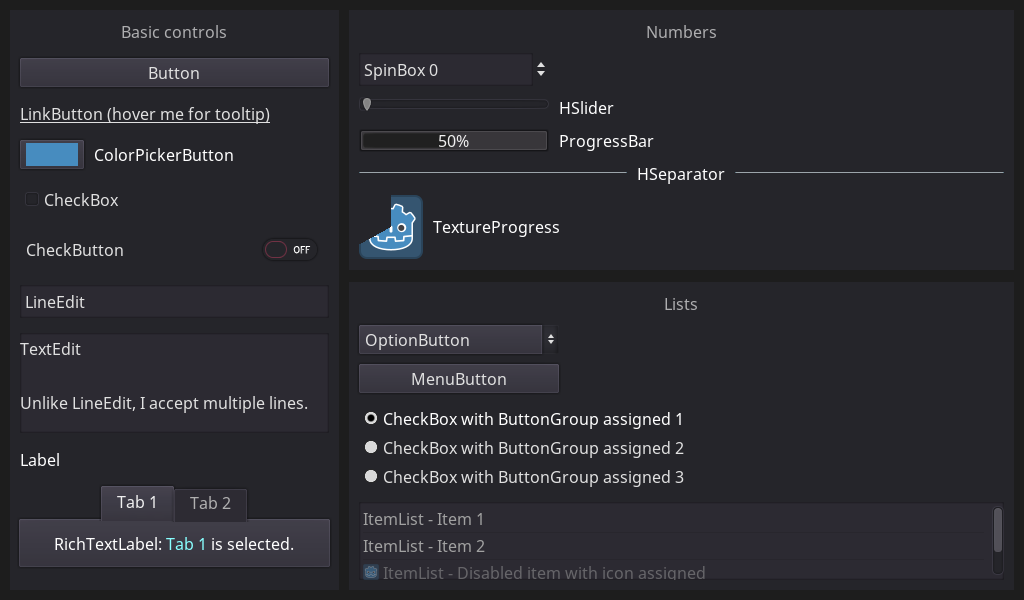
We all want a good display for menus (settings, shops, etc). In previous entries, I used simple list menus for everything, now it's time to go beyond that. Today I want to write a bit about how to make use of godot's "Control Gallery". ( https://godotengine.org/asset-library/asset/890 )
If we click on that link, and download the assets, we can see a demo like this:
However, it only displays the different buttons and make the animations of them, but they have no actual effect. So, the next step should be making something with them. To do that, we can go to the documentation here: https://docs.godotengine.org/en/stable/tutorials/ui/control_node_gallery.html
After many definitions, there's no actual examples of use, I'll try to fix that here with a mini guide:
First, we need to download the asset and open the project to understand how the visual effects of the buttons are done. We can see those are described in the inspector, on the right side of the window.
You might think that didn't require any explanation. Actually... we are going to use the node, to create a signal,
and that's at the same side of the window. We want to have both clearly differentiated, and that's a good way.
Now, for the main part of the entry, let's make the check button do an action:
- Create a new script for your parent node. You'll be adding the actions there later. Example below,
- Click into your selected button. (We'll use the check button, green arrow pointed to the left)
- Go to the node panel and click to create/connect a new signal (green arrow pointed to the right)
- This new function with the alarm is the code we want to edit for our purpose,
Example to change the running scene:
```
func _on_Button_pressed():
get_tree().change_scene("res://SceneName.tscn")
```
A different example, to see the visual effects, is to attach a script to the node and edit its values:
[No need of the use of signals for this] (Here you have the code to update the icon progress bar)
```
# Called every frame. 'delta' is the elapsed time since the previous frame.
func _process(_delta):
if value < 100:
value = value + 1
else:
value = 0
```
That's all for today. I hope this helps to those who didn't know how to start working with them.
PS: If you want to add keyboard/pad control for those buttons, you want to read this https://docs.godotengine.org/en/3.5/tutorials/ui/gui_navigation.html and use:
```
Wednesday, October 25, 2023
Dungeon action
Before going into the new stuff for the mini-game, a few bug fixing have to be made upon the previous job:
0 - Write the tile sizes for the map properly,
`var map_size = Vector2(960/16,544/16) # Display | Window Size / tile size`
1 - To avoid the player moving while the talking text is being displayed, a new variable
for the player script is added, ` export var canMove = true `. In addition, now the NPC
script will modify that accordingly:
```
func set_hiden(value):
talk = value
# Show/Hide dialogue
$CanvasLayer.visible = talk
if talk == true :
get_parent().get_node("Player").canMove = false
else :
get_parent().get_node("Player").canMove = true
```
This adds extra complexity to the game and code, due to that and the nature of this project I've only included the most obvious cases, but there are more. To put it simply, we're only going to check if a background (dark pit) exists in the spawning position [If you want to do an exercise, check if characters overlap to add that case].
Tip: Add the objects you want to spawn into a group, so you can automatize (help in the screenshot).
```
func add_characters():
var pos = Vector2() # Spawn position
for obj in get_tree().get_nodes_in_group("groupSpawn"):
var spawn = false
pos = spawn(pos)
while canSpawn(pos) == false:
pos = spawn(pos)
obj.global_position = pos
func canSpawn(char_pos):
# Check if the character is spawning in a good tile or not
var cell_coordinates = get_node("Background").world_to_map(char_pos)
var cellid = get_node("Background").get_cellv(cell_coordinates)
if cellid == -1 :
true
else :
false
func spawn(pos):
# Screen size HEIGHT WEIGHT
var HEIGHT = get_viewport().get_visible_rect().size.y
var WEIGHT = get_viewport().get_visible_rect().size.x
var rng = RandomNumberGenerator.new()
rng.seed = randi()
pos = Vector2(rng.randi_range(0,WEIGHT) , rng.randi_range(0,HEIGHT) )
return pos
```
After those fixes, we need the base for the HUD ready to show how many items we have.
We've also added a Dictionary structure here to track the objects in the inventory.
Assets for this part: https://gfragger.itch.io/magic-market
TIP: Change the cell name, so you can reference it in your script, check these 2 images:
1 - Go to your tileset Node, and click on TileMap, then on Tileset

And add the methods to procedurally generate them, in the same script. We will also make the collectable tracking process in this script. You can see the changes in the code for the dungeon2D.gd script methods below:
> The cell size of the objects can also create weird results if they are not resized accordingly
Example in the screenshot:
(With a distance in the origin grid map, the global_position 0,0 in both of them will look like this).
Example, to visualize, here: https://youtu.be/1e_dmDW73IQ?t=395
Assets: https://theartofnemo.itch.io/free-rpg-monsters-dragon-evolutions
Code to make the dragon chase us (this is the same code you would use if you want a companion NPC to follow you).
Obviously, this code is for the Dragon script, with its own node (you can copy the other NPC and add this code as a way to test it)
```
extends KinematicBody2D
onready var speed = get_parent().get_node("Player").speed
func _physics_process(delta):
var velocity = Vector2.ZERO
var direction = get_parent().get_node("Player/Area2D/CollisionShape2D").global_position
velocity = self.global_position.direction_to(direction) * speed
velocity = move_and_slide(velocity)
```
The next part should be the shop. However, to keep these entries short enough, this will be in the next entry (Hopefully that's the last one of this procedural mini-dungeon project).


.png)