Showing posts with label samples. Show all posts

Thursday, February 22, 2024

Visual Novel with renpy

Another engine, again...

I wanted to test out a Visual Novel Demo. Which means: "Different goals, different methods".

Let me assure you, I am not leaving behind the samples with SDL from the beginning of this blog, I am also not going to stop using Godot for many of my projects (at least for now). This is "only" another extra tool for my bag.

Question: Why now?
Answer: Now, because Ren'Py, like Godot, is in active development. In future iterations compatibility might break, with this Demo I can write down the version that works for the vita before it's too late (you don't want to keep trying versions in the future to find one that can export without crashing).
If a new one works, go ahead and use it, if they don't, you have this one as a back-up.

Question: Why Ren'Py?
Answer: Because Ren'Py is open source and free for commercial use. This engine is also one of the most widely known and used for Visual Novels. It works nicely for PS Vita (loading times aside), and It's easy to use.


With that explained, it's time to get our hands dirty. I decided to call this Demo "Conociendo Hokkaido" to make a somewhat nice presentation of the place in the future and, at the same time, present the Ren'Py
basics too. This time (entry) however, will be mostly about how to set everything up, and make a sample VPK build for the vita. [At the end of the entry, you will find a link to a GitHub repo with this project]

To be fair, most of the engine is pretty straightforward or is explained in their quick start guide https://www.renpy.org/doc/html/quickstart.html (in addition to the whole documentation). However, a few adjustments are necessary to make them work with the PS Vita. Besides, some features (like input) may crash the PS Vita.

The first we need is the engine and the means to export for the vita, to do that, I've used:
Ren'Py Version used: Ren'Py 7.3.5.606 ( https://www.renpy.org/release/7.3.5 )
Ren'Py PSVita Distribution Tool: (crash report says) 7.4.9 Ou ( https://github.com/SonicMastr/renpy-vita )

With that out of hands, let's boot up Ren'Py and create our project:

Since we are making the project to play in the vita, we'll use the console resolution (960, 544). Other than that, just create your project normally:

> 'Create New Project' > Project Name > 'Custom. The GUI is optimized for a 16:9 aspect ratio.'
> WIDTH: 960 > HEIGHT: 544 > Select Accent and Background Colors.

You can see an example in the image below:


When it finishes, it creates a new folder with all the default files. We can now edit them to make our Visual Novel.


We will need to have PS Vita livearea files eventually, I put them here too so they can be found easily.


Besides, I added a few files for my Demo to make it more personal (If we were making a full project, this is how you add them too). [You can omit this step if you are just setting up the engine]

Conociendo Hokkaido > Game > images
Conociendo Hokkaido > Game > audio
Conociendo Hokkaido > Game > gui

Something like the following image:


Back to Ren'Py, if you have received an already created project, and it doesn't show on your project list, you can press on refresh to make them appear.


The basic GUI of the engine displays the following:

> Edit file (it has the code for your game):
    It is useful to say that you can open all rpy files with any text editor of your likeness.
    [This may be worth it to check (or ask) things without opening the whole Ren'Py launcher]


    # options.rpy contains options that can be changed to customize your game.

    # script.rpy contains the actual script for your game

    # gui.rpy contains the GUI Configuration

    # screens.rpy contains the configurations for the screens used to display dialogue to the player.


> Actions (it has some autoconfigurations to check your game's files to look for potential problems)

> Build distributions (is what you expect)
    * The vita export doesn't show here because the tools for it are unofficial.
    

To summarize, in this demo: I've added music, a scene with two minibranches, and one common ending.

* I've also tried to use the input method with the vita keyboard:

```
    $ pName = renpy.input("Write your name and press enter to start the game.", length=10) or "Bunkai"
```

At first, it saves the input (or the lack of it). After that, it glitches out and prompts the keyboard again (this second time the input is not used). As a result, the dialogue for the input prompt and the dialogue right after your first input will be hidden by the keyboard screen.
[None of this happens in the PC version. That resulted in me commenting the input for the time being]


With the basic features somehow finished, and being myself from Spain, I also wanted to have the demo translated (or at least to make the option easy). I used the official documentation for it,
https://www.renpy.org/doc/html/translation.html . However, for me, these explanations were a bit confusing in some parts, and I had to make some trial and error. As a result, I think it's a good idea to share a step by step here with screenshots.

First, we need to know where the default language is stored (it will help us to avoid headaches later):
 `This is called the None language, regardless of what language it actually is.`
We can find the files at: Conociendo Hokkaido > Game > tl


Now it's time to go back to the launcher and generate the translation/localization files.
To do that, go to the 'Generate Translations' section:


A bit overwhelming menu will be displayed, but don't get discouraged, this is what we need to know:


> Language: This is the name of the target language of your translation files.

> Generate empty strings for translations: as the name implies, you will see your Localized lines empty or filled with the original text. (This difference will be shown in the print screen with the translations, where it is the clearest)
 
When the settings are done, press on 'Generate Translations' and the new files will be created.

Before actually translating the sentences, we also want the language option to show in our game. This part is pretty important, and the instructions in the guide could be easily overlooked (or difficult to follow) for a beginner, making a quest to find were the new code goes. To fix this, here's another example:
 
`The Language action can be used to add a language preference to the preferences screen:`

> The path is as follows: 'Project's name' > Game > screens.rpy

Scroll down, until you see something like this:

```
## Preferences screen ##########################################################
##
## The preferences screen allows the player to configure the game to better suit
## themselves.
##
## https://www.renpy.org/doc/html/screen_special.html#preferences
```


Then add/edit this block there:

```
                vbox:
                    style_prefix "pref"
                    label _("Language")
                    textbutton "English" action Language(None)
                    textbutton "EspaƱol" action Language("es_es")
```

[you can put as many extra languages as you want the same way, just add more textbuttons)]


It's time to launch the game within the engine and see the results:
(a new language option has been added)


Now it's time to really translate/localize the game, the files to do that are in the following path:
'Project's name' > Game > tl > 'the previously input name for the new language'
You can see a comparison with the default language from the script in the image below:


'screens.rpy' for menus and preferences
'script.rpy' for the story text
'common.rpy' for prompt messages


The last step is to export our project to play in our beloved PS Vita. To do that, We need to copy the whole project folder from Ren'Py directory to the Ren'Py PS Vita Distribution Tool. It will look like this:


Here, run the 'Ren'Py PS Vita Distribution Tool.exe' and the export config window will be displayed:


The 'Build VPK0' button will not activate until you have filled the blankets, so don't worry. Extra notes to have into account:
 
> write the version parameter with the '00.00' format, or the VPK installation will fail.
> include your 'sce_sys' folder inside your project's folder (like I did in 'Ren'Py)


With that, you have a working Visual Novel Demo for your PS Vita. If you want to try the one from this entry, or use it as the starting point for yours, here's the link to the GitHub repo:
https://github.com/Bunkai9448/ConociendoHokkaido_renpyVita


---

Aditional notes: 

- No self-voicing, as the vita doesn't have TTS

- Load times can be pretty long due to hardware limitation.

- Video playback will not work

- Quiting by the menu will crash the app, but 
doesn't affect anything else.

Saturday, October 7, 2023

New Engine

I had a secret halted demo game for a long time (due to some nasty bugs), so when I found out about the new Homebrew contest for the vita I knew it was time to squash them and release it: https://fuhen.homebrew-contest.com/submissions/23/ 
 
Besides, thanks to the FuHEN Homebrew Contest for PS VITA, I discoverd some options that I didn't know. And since this blog is to develope homebrew for that console, I decided to add the info here. After reading around the resources page: https://fuhen.homebrew-contest.com/resources/ I discover a new interesting option for coding my Ice Puck homebrew, which is the Godot Engine: https://github.com/SonicMastr/godot-vita/releases/tag/3.5-rc5-vita1 
 
Official documentation for Godot 3.5 here:

Then, I tried to make a test exporting the game "3D Squash the Creeps starter project" (which also is a good introduction to the engine for beginners). A video explanation of how to code it can be found here: https://www.youtube.com/watch?v=YiE9tcoCfhE and the code's official repo is here: https://github.com/gdquest-demos/godot-3-getting-started-2021/releases/tag/1.0.0 
 

 As explained in the README, for it to work on the vita, we need to make a few adjustments to the project settings. 
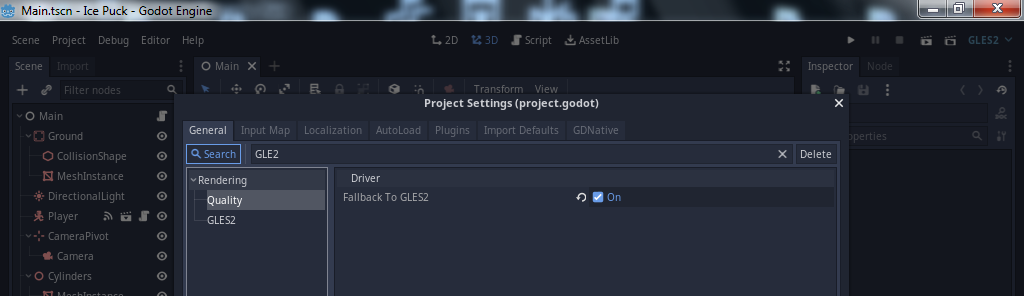
(For newbies who don't find that config in the engine) I will explain those steps below, with screenshots: 
 
 Go to Project > "Project Settings..." 


Click on Search and type "GLE2" 
Then click Quality and mark the box "Fallback to GLE2" 


Next it's turn to: Click on Search and type "ETC2" 
Then click on VRAM compression and mark the box "Import ETC2"


After that, close the window. 
 
 
Finally to export your game: 
 
Go to Project > "Export..." 

When it asks for an export template, choose and load the "vita_template_3.5.rc5.tpz" file from the github.


Time to make and play your own games!

Friday, May 19, 2023

Modularity

A well-designed program must be modular if it has a big size, and guess what, these projects are big. So, for this entry, we will be making a modular base for our program. This means, we want at least 3 modules (files):

  • main program

----------------------------------------------------------

Wednesday, March 1, 2023

Back to the Basics

 After more than two years, I've come back here, with the original idea still as hot as the first day. However, the approach of this entry is to create a new generic sample, so it can be checked in any system quickly.

Doing this, we can have something (similar to an SDL hello world) to test, without any Vita or SDK requirement. Besides, we can use it as a base for everything else.


First, we'll need to create our main.c file
(check https://lazyfoo.net/tutorials/SDL/01_hello_SDL/index2.php for more info)

----------------------------------------------------------

Wednesday, August 12, 2020

Basics on the code PART 13

In this entry we are going to read about the microphone options on the vita. For that we are using the vitasdk audio section and more specificly the audioin library.

Note: With this entry we are finishing the samples reading for now, and will start with the next step in the future one.

There is not much new to say appart to comment that the info received in the mic port is save in a buffer.

SAMPLE "microphone"

microphone: Demonstration of microphone features.

/*
    Simple microphone test program
    - displays audio in data
    - displays small VU meter based on
      an average of the audioIn buffer
    - increase or decrease the sensitivity
      of the VU meter with up/down buttons
    - exit with select
    Enjoy,
        -pyroesp
*/


#include <psp2/kernel/threadmgr.h>
#include <psp2/kernel/processmgr.h>
#include <psp2/audioin.h>
#include <psp2/ctrl.h>

#include <stdlib.h>
#include <string.h>

#include "debugScreen.h"

#define printf psvDebugScreenPrintf

#define SEC_MULTIPLIER 1000000
#define MAX_WORDS_PER_LINE 23
#define MAX_VU 32

/* Tested sample rates - grain */
/* 16kHz ; 256 */
/* 48kHz ; 768  (= 16kHz*3 ; 256*3) */

int main(int argc, char *argv[]){
    int exit = 0;
    /* sample rate */
    int freq = 16000;
    /* grain */
    int grain = 256;
    /* audio in port */
    int port = 0;

    /* If size > grain */
    /* audio buffer will be filled only up to [grain - 1] */
    int size = 256;
    short *audioIn = NULL;

    psvDebugScreenInit();
    printf("Microphone test:\n\n");
    printf("Press up/down for VU sensitivity.\nPress select to quit.\n\n");

    audioIn = (short*)malloc(sizeof(short) * size);
    memset(audioIn, 0, sizeof(short) * size);
    /* Open port */
    port = sceAudioInOpenPort(SCE_AUDIO_IN_PORT_TYPE_VOICE, grain, freq,
                SCE_AUDIO_IN_PARAM_FORMAT_S16_MONO);

    printf("Port value 0x%X - buff size %d\n", port, size);

    /* Check for SceAudioInErrorCode enums */
    if (0 > port){
        exit = 1;
    }

    printf("Audio buff address = 0x%X\n\n", audioIn);
    sceKernelDelayThread(2 * SEC_MULTIPLIER);
    printf("Read audio:\n");

    int i, j;
    int average;
    int audioInMax;
    int sensitivity = 3;
    int retVal;

    SceCtrlData ctrl, oldCtrl;

    printf("\e[s");  // save cursor position
    while (!exit){
        average = 0;
        audioInMax = 0;
        printf("\e[u");  // return to saved cursor position
        /* Read audio */
        retVal = sceAudioInInput(port, (void*)audioIn);
        if (retVal){
            exit = 1;
            break;
        }

        /* Print all values in audio buffer, 23 WORDs per line */
        for (i = 0; i < size; i += MAX_WORDS_PER_LINE){
            for (j = 0; j < MAX_WORDS_PER_LINE && size > (i + j); j++){
                /* remove unwanted values < 0 */
                if (0 > audioIn[i + j])
                    audioIn[i + j] = 0;

                printf("%04X ", audioIn[i + j] & 0xFFFF);
                average += audioIn[i + j];

                if (audioInMax < audioIn[i + j])
                    audioInMax = audioIn[i + j];
            }
            printf("\n");
        }

        average /= size;
        average = ((average * sensitivity) * MAX_VU) / audioInMax;
        /* Get microphone status */
        /* Other values than 1 in GetStatus returns 0x80260106 */
        printf("\nYour microphone is %s\n\n", sceAudioInGetStatus(1)?"disabled.": "enabled. ");
        printf("\nSimple VU meter: (sensitivity = %3d)\n\n\n", sensitivity);
        for (i = 0; i < MAX_VU; i++){
            printf("\e[7G");  // set cursor to column 7 (for 8x8 font)
            if (i < average){
                if (MAX_VU/2 > i)
                    psvDebugScreenSetBgColor(0xFF00FF00);
                else if (MAX_VU*3/4 > i)
                    psvDebugScreenSetBgColor(0xFF00FFFF);
                else
                    psvDebugScreenSetBgColor(0xFF0000FF);

            }else{
                psvDebugScreenSetBgColor(0xFF000000);
            }
            printf("   \n");
        }
        psvDebugScreenSetBgColor(0xFF000000);

        sceCtrlPeekBufferPositive(0, &ctrl, 1);

        if ((ctrl.buttons & SCE_CTRL_UP) && !(oldCtrl.buttons & SCE_CTRL_UP))
            sensitivity++;
        else if ((ctrl.buttons & SCE_CTRL_DOWN) && !(oldCtrl.buttons & SCE_CTRL_DOWN))
            sensitivity--;
        else if (ctrl.buttons & SCE_CTRL_SELECT)
            exit = 1;

        if (0 >= sensitivity)
            sensitivity = 1;

        memcpy(&oldCtrl, &ctrl, sizeof(SceCtrlData));

        sceKernelDelayThread(10000);
    }

    free(audioIn);
    sceAudioInReleasePort(port);
    sceKernelExitProcess(0);
    return 0;
}


-----------

Screenshot from the sample running on the vita:


And that's all for this sample.

Tuesday, August 4, 2020

Samples common files & code PART 2

In today's entry we are going to read about the net conexions and the ps vita (sockets). For that matter, we are using the Vita SDK documentation, network section.

This section gets into net modules on the vita, and its conections with everything related to sockets and HTTP.

Our project doesn't involve any of that, that is why this is a brief entry of the samples that cover this modules. If we need some of this code later we can go back and take a more deep aproach.

Note: the samples download the data in the ux0:data/ directory.


SAMPLE "socket_ping"

socket_ping: ICMP ping using raw sockets.

In its main.c you can read mostly about structs with the icmp datagrams and the ping data.

Note: These are to test if your connexion is active, and if the dns you are trying to connect is on (the sample use the google dns because is public, wide and "always" online). You can read more about this on their wikipedia pages: wikipedia icmp, wikipedia ping.


SAMPLE "net_http"

net_http: A minimal HTTP download sample.

In its main.c it shows how to load the module and download an html file from its web

Note: this is the basic function of a web browser.


SAMPLE "net_http_bsd"

net_http_bsd: A minimal HTTP download sample using BSD sockets.

This sample does the same as the net_http but using Berkeley Software Distribution Sockets. and shows the results on screen (the downloaded result generated a core dumped error to us tho).


SAMPLE "net_libcurl"

net_libcurl: A libcurl download sample.

Its main.cpp again shows how to load the module and use it to download a file from a webpage (specificaly the "vita_cord.vpk"), but this time use libcurl for the process.

Note: libcurl is a free and easy-to-use client-side URL transfer library.


-----------

Some screenshots from the samples running on the vita: 

And that's all for this entry.
net_http

net_http_bsd

net_libcurl


Thursday, July 30, 2020

Basics on the code PART 12

In today's entry we were going to read and compile the prx_loader and the prx_simple, which is about the PRX or Playstation Relocatable Executable. Those are about plugin creation (start and stop modules).

For that goal, you can also look into https://tai.henkaku.xyz/ . And also recommended to read about the SceDisplay  (handles management of the framebuffers), and the SceKernelModulemgr (is in charge of loading both user modules and kernel modules)

However, after reading the sample and trying to compile it (for a whole day with breaks), receiving some errors, warnings and whatnot (yes we check other samples to see if the sdk was gone or something, and we tried to solve some of them). We have decide it to just speak about the failure and let that sample appart.

Explanations: Why let it appart? Are you giving up? Are you doing the same with future similar failures? No, we are not giving up, we let that appart because it is about plugins and we don't need that currently. We can go back there in the future when need it, and we have the taihenkaku web for a more clarified way to do them (also we can figure them out with actual plugins if we need to).

Note: While trying to solve the problems, we look other resources and the other big SDK for the vita. Those are the cbps web (currently with an error 523, Origin is unreachable), and the dolce sdk forum a.k.a cbps forum.

Note 2: The vita sdk and the dolce sdk will be appart in time, but currently (as one is a fork from the other) they have the same samples (they only have different cmakelists to differentiate one sdk name with the other). This is useful to know if we want to make a transition or something (more deep knowledge in the sdk will be used when creating the main project of the blog).

Note 3: It must be stated, that the errors found may or may not be caused by us or by the samples' coding.


Having said that, we want to give a brief overview with 2 images of the compiling:

First we tried to read, understand and compile the prx_loader sample. It gaves us, several errors:

   - Lot of them where undeclared functions
     (caused by the lack of a/some include/s, which should be in one of the header files already included).

prx_loader compiling errors

And Then, we decided to compile the prx_simple as it uses the loader as base and goes further.
That means it should give similar errors and/or we can use it to solve some of them. This one gave less errors, nonetheless it gave them:

   - The first time it gave us only three.

prx_simple with 3 compiling errors


 - we reduced them to two adding one include,  #include <psp2/display.h>

prx_simple with 2 compiling errors


 - After this, it seemed easy to solve (giving types to those variables)
   We look in other files what where their types and added them.

prx_simple with errors on the link part


 - Yet again, although it compiled the first part, it gave us more errors, this time, on the link part.
   Knowing this is mostly kernel related we didn't want to take any risk and stop after more fruitless investigation.

Samples common files & code PART 1

We have seen many code samples about the ps vita's handlement of inputs. and some more about how to show info on screen. Although there are still a few samples with functions unseen, in this entry we are going to review some of the basics. To do this we are going to use some samples we have not seen before, because they would have been overlapped with others samples needlessly.

Note: they may be overlapped with others, but that does not mean they are less important. Many people may have started with them instead.

The specific samples we are going to use for review are:

    common: Common functions for samples.
    debug_print: A minimal debug print sample.
    debugscreen: Debug text printing sample.
    pretty_livearea: A minimal hello world sample with example livearea styling and features.

Note: As we did with the first sample entry, we are going to review the files primarily.

Without further ado, let's start!


SAMPLE "common"

// headers and functions for the screen output. Data formats, and its memory control.
 debugScreen.h
 debugScreen.c

//Like the name says it has the font properties at low-level.
 debugScreenFont.builder.html
 debugScreen_custom.h
 debugScreenFont.c


SAMPLE "debug_print"

 // it basically shows you a printf like the hello_world sample, but with more details (foreground/background colors)
 // to make your debugging more appealing with colors in your printed messages.
 main.c


SAMPLE "debugscreen"

 //  test functions to check stuff on the vita, it has a lot of info about what is shown on screen.
 main.c

SAMPLE "pretty_live area"

// it has the same code as in the hello_world sample. But here you have other 2 images, to know how to make your homebrew more atractive.


-----------

Some screenshots from the samples running on the vita:

pretty_live area

debug_print

debugscreen


And that's all for this entry.

Tuesday, July 28, 2020

Basics on the code PART 11

In this entry we will see how the vita generates sounds. This could be useful when we want warnings or similar things to have sound.

Note: The VM we were using was setup without enough space and "broke", so we will be using another one with ubuntu 20 from now on. The reason of the firmware change is explained in this entry. If your machine have enough space, it is not required to change it.

To help us to understand the functions of this sample, we have to use the vitasdk documentation, for this specific sample we will use the audio section. Also, the the audioout header section.


SAMPLE "audio"

audio: Simple audio wave generator.


#include <stdint.h>
#include <math.h>

#include <psp2/ctrl.h>
#include <psp2/audioout.h>
#include <psp2/kernel/processmgr.h>

#include "debugScreen.h"

// functions to control the frequency changes
#define countof(A) sizeof(A)/sizeof(*A)
#define MIN(A,B) ((A)<(B)?(A):(B))
#define MAX(A,B) ((A)>(B)?(A):(B))

#define printf psvDebugScreenPrintf

// frequency function and its variables based on the button input to change accordingly
double gen_sqr(double p){return p>.5?-1.:1.;}
double gen_tri(double p){return p*2;}
double gen_nul(double p){return 0.;}
double gen_sin(double p){return sin(2*M_PI*p);}

typedef double (*wav_gen)(double);

// audio wave generetator function
void wave_set(int16_t*buffer, size_t size,  wav_gen generator){
    for (size_t smpl = 0; smpl < size; ++smpl)
        buffer[smpl] = 0x7FFF*generator((float)smpl/(float)size);
}

// main program

int main(void) {
    psvDebugScreenInit();


// audio and wave variables during the execution
    int freqs[] = {8000, 11025, 12000, 16000, 22050, 24000, 32000, 44100, 48000};
    int size = 256;
    int freq = 8;
    int mode = SCE_AUDIO_OUT_MODE_MONO;
    int vol = SCE_AUDIO_VOLUME_0DB;


// current running wave variable
    int port = sceAudioOutOpenPort(SCE_AUDIO_OUT_PORT_TYPE_BGM, size, freqs[freq], mode);
    sceAudioOutSetVolume(port, SCE_AUDIO_VOLUME_FLAG_L_CH |SCE_AUDIO_VOLUME_FLAG_R_CH, (int[]){vol,vol});


// wave data and its control functions based on the input button in execution time
    int16_t wave_buf[SCE_AUDIO_MAX_LEN]={0};
    wav_gen gen=gen_nul;
    SceCtrlData ctrl_peek, ctrl_press;
    do{
        ctrl_press = ctrl_peek;
        sceCtrlPeekBufferPositive(0, &ctrl_peek, 1);
        ctrl_press.buttons = ctrl_peek.buttons & ~ctrl_press.buttons;

        if(ctrl_press.buttons == SCE_CTRL_CIRCLE)
            gen=gen_sin;
        if(ctrl_press.buttons == SCE_CTRL_SQUARE)
            gen=gen_sqr;
        if(ctrl_press.buttons == SCE_CTRL_TRIANGLE)
            gen=gen_tri;
        if(ctrl_press.buttons == SCE_CTRL_CROSS)
            gen=gen_nul;
        if(ctrl_press.buttons & (SCE_CTRL_CROSS|SCE_CTRL_TRIANGLE|SCE_CTRL_SQUARE|SCE_CTRL_CIRCLE))
            wave_set(wave_buf,size,gen);
          
        if(ctrl_press.buttons == SCE_CTRL_RIGHT)
            freq = MIN(countof(freqs)-1, freq+1);
        if(ctrl_press.buttons == SCE_CTRL_LEFT)
            freq = MAX(0, freq-1);
        if(ctrl_press.buttons == SCE_CTRL_RTRIGGER)
            size = MIN(SCE_AUDIO_MAX_LEN,size+1000);
        if(ctrl_press.buttons == SCE_CTRL_LTRIGGER)
            size = MAX(SCE_AUDIO_MIN_LEN,size-1000);
        if(ctrl_press.buttons & (SCE_CTRL_RIGHT|SCE_CTRL_LEFT|SCE_CTRL_LTRIGGER|SCE_CTRL_RTRIGGER)){
            sceAudioOutSetConfig(port, size, freqs[freq], mode);
            wave_set(wave_buf,size,gen);
        }

        if(ctrl_press.buttons == SCE_CTRL_UP)
            vol = MIN(vol+1024,SCE_AUDIO_VOLUME_0DB);
        if(ctrl_press.buttons == SCE_CTRL_DOWN)
            vol = MAX(vol-1024,0);
        if(ctrl_press.buttons & (SCE_CTRL_UP|SCE_CTRL_DOWN))
            sceAudioOutSetVolume(port, SCE_AUDIO_VOLUME_FLAG_L_CH |SCE_AUDIO_VOLUME_FLAG_R_CH, (int[]){vol,vol});

        sceAudioOutOutput(port, wave_buf);
        printf("freq:%-5i size:%-5i vol:%-5i  wave:{%+6i..%+6i..%6i..%+6i }\r",
                freqs[freq], size, vol, wave_buf[0*size/4], wave_buf[1*size/4], wave_buf[2*size/4], wave_buf[3*size/4]);//\e[H
    }while(ctrl_press.buttons != SCE_CTRL_START); // // sample loop for testing until start button is pressed


    sceAudioOutReleasePort(port);
    sceKernelExitProcess(0);
    return 0;
}


-----------

Some screenshots from the sample running on the vita:

Basic screen before any input

Wave stopped (after being running)

One posible running wave

And that's all for this sample.

Sunday, July 26, 2020

Basics on the code PART 10

Today we are going to read the sample about the ps vita's camera features

To help us to understand the functions we have to use the vitasdk documentation, for this specific sample we will use the camera section.

SAMPLE "camera"

camera: Demonstration of camera features.


#include <stdbool.h>
#include <stdio.h>
#include <stdlib.h>
#include <string.h>
#include <psp2/kernel/sysmem.h>
#include <psp2/display.h>
#include <psp2/ctrl.h>
#include <psp2/camera.h>
#include <psp2/kernel/processmgr.h>

// screen memory allocation variables
#define ARRAYSIZE(x) (sizeof(x)/sizeof(*x))
#define DISPLAY_WIDTH 640
#define DISPLAY_HEIGHT 368

// main program

int main(void){
    void* base;

// memory allocation for the camera buffer
    SceUID memblock = sceKernelAllocMemBlock("camera", SCE_KERNEL_MEMBLOCK_TYPE_USER_CDRAM_RW, 256 * 1024 * 5, NULL);
    sceKernelGetMemBlockBase(memblock, &base);

    SceDisplayFrameBuf dbuf = { sizeof(SceDisplayFrameBuf), base, DISPLAY_WIDTH, 0, DISPLAY_WIDTH, DISPLAY_HEIGHT};


    int cur_res = 1;// 1-8 (maybe more)
    int cur_cam = 0;//front:0, back:1
    int cur_fps = 6;
    int cur_fmt = 5;

// set sample mode
    sceCtrlSetSamplingMode(SCE_CTRL_MODE_ANALOG);
    SceCtrlData ctrl_peek;SceCtrlData ctrl_press;

// basics options variables about the data info of the pictures
    do{
        int cur_sat=0,cur_rev=0,cur_efx=0,cur_iso=0,cur_zom=10,cur_nim=0,cur_wbl=0;
        size_t res_table[][2] = {{0,0},{640,480},{320,240},{160,120},{352,288},{176,144},{480,272},{640,360},{640,360}};
        size_t fps_table[] = {3,5,7,10,15,20,30};
        sceCameraOpen(cur_cam, &(SceCameraInfo){
            .size = sizeof(SceCameraInfo),
            .format = cur_fmt,//422_TO_ABGR
            .resolution = cur_res,
            .framerate = fps_table[cur_fps],
            .sizeIBase = 4*res_table[cur_res][0]*res_table[cur_res][1],
            .pitch     = 4*(DISPLAY_WIDTH-res_table[cur_res][0]),
            .pIBase = base,
        });


        sceCameraStart(cur_cam); // start the camera

        // setting camera features and commanidng buttons
        do{
            ctrl_press = ctrl_peek;
            sceCtrlPeekBufferPositive(0, &ctrl_peek, 1);
            ctrl_press.buttons = ctrl_peek.buttons & ~ctrl_press.buttons;
           
            sceCameraSetBrightness(cur_cam, ctrl_press.rx);
            sceCameraSetContrast(cur_cam, ctrl_press.ry-100);
            sceCameraSetEV(cur_cam, (ctrl_press.lx-128)/7);//-20...20
            sceCameraSetGain(cur_cam, (ctrl_press.ly<100)?ctrl_press.ly/6:0);//0..16 //don't seem to work
            if(ctrl_press.buttons & SCE_CTRL_TRIANGLE)
                sceCameraSetSaturation(cur_cam,   cur_sat=((cur_sat+5)%45));
            if(ctrl_press.buttons & SCE_CTRL_CIRCLE)
                sceCameraSetReverse(cur_cam,      cur_rev=((cur_rev+1)%4));
            if(ctrl_press.buttons & SCE_CTRL_CROSS)
                sceCameraSetISO(cur_cam,(int[]){1,100,200,400}[cur_iso=((cur_iso+1)%4)]);
            if(ctrl_press.buttons & SCE_CTRL_SQUARE)
                sceCameraSetEffect(cur_cam,       cur_efx=((cur_efx+1)%7));
            if(ctrl_press.buttons & SCE_CTRL_LTRIGGER)
                sceCameraSetWhiteBalance(cur_cam, cur_wbl=((cur_wbl+1)%4));
            if(ctrl_press.buttons & SCE_CTRL_RTRIGGER)
                sceCameraSetNightmode(cur_cam,    cur_nim=((cur_nim+1)%4));
            if(ctrl_press.buttons & SCE_CTRL_SELECT)
                sceCameraSetZoom(cur_cam,         cur_zom=((cur_zom+1)%41));

            /* TODO: find more button combo to trigg :
                sceCameraSetAntiFlicker(int cur_cam, int mode);
                sceCameraSetBacklight(int cur_cam, int mode);
            */

//
            if(sceCameraIsActive(cur_cam)>0){
                SceCameraRead read = {sizeof(SceCameraRead),0/*<Blocking*/};
                sceCameraRead(cur_cam, &read);
                sceDisplaySetFrameBuf(&dbuf, SCE_DISPLAY_SETBUF_NEXTFRAME);
            }

// actual testing functions and comunicating the commands to the console
        }while(!(ctrl_press.buttons & (SCE_CTRL_UP|SCE_CTRL_DOWN|SCE_CTRL_LEFT|SCE_CTRL_RIGHT|SCE_CTRL_START)));
        sceCameraStop(cur_cam);
        sceCameraClose(cur_cam);
        if(ctrl_press.buttons & SCE_CTRL_UP)
            cur_res=(cur_res+1)%ARRAYSIZE(res_table);
        if(ctrl_press.buttons & SCE_CTRL_DOWN)
            cur_cam=(cur_cam+1)%2;
        if(ctrl_press.buttons & SCE_CTRL_LEFT)
            cur_fps=(cur_fps+1)%ARRAYSIZE(fps_table);
        //may overflow the drawbuffer => TODO:reallocate drawbuff on format change
        //if(ctrl_press.buttons & SCE_CTRL_RIGHT)
        //    cur_fmt=(cur_fmt+1)%9;

    }while(!(ctrl_press.buttons & SCE_CTRL_START));  // sample loop for testing until start button is pressed

    sceKernelFreeMemBlock(memblock); // free the used memory block
    sceKernelExitProcess(0); // close the vita proccess runing, usually close the app
    return 0;
}


-----------

Some screenshots from the sample running on the vita:


Daily mode

Negative mode

Negative + mirror mode (180 degree rotation)

Yellow filter

Pink filter

Rear screen in the corner, with front screen frozen


And that's all for this sample.

Monday, July 20, 2020

Basics on the code PART 9

Today we are going to read the sample about the touch screens (frontal and rear pannel) of the vita.

To help us to understand the functions we have to use the vitasdk documentation, for this specific sample we will use the touch section.  

Note: there seems to be some functions that are based on previous versions of the SDK, but they are with the newer ones, so we'll try to join the explanations unless other requirements arise.

SAMPLE "touch"

touch: A minimal touch sample.


#include <psp2/kernel/processmgr.h>
#include <psp2/touch.h>

#include <stdio.h>
#include <string.h>

#include "debugScreen.h"

#define printf psvDebugScreenPrintf

/* TODO: why touch[port].report[i].force is always at 128 ? */

// main program

int main(int argc, char *argv[]) {
    psvDebugScreenInit();  // needed for the prints to show on the vita screen.


// as in other samples, here is written the stop condition for the sample

    printf("swipe to the bottom with 1 finger to stop\n");
    /* should use SCE_TOUCH_SAMPLING_STATE_START instead of 1 but old SDK have an invalid values */
    sceTouchSetSamplingState(SCE_TOUCH_PORT_FRONT, 1);
    sceTouchSetSamplingState(SCE_TOUCH_PORT_BACK, 1);
    sceTouchEnableTouchForce(SCE_TOUCH_PORT_FRONT);
    sceTouchEnableTouchForce(SCE_TOUCH_PORT_BACK);
   
    SceTouchData touch_old[SCE_TOUCH_PORT_MAX_NUM];
    SceTouchData touch[SCE_TOUCH_PORT_MAX_NUM];


// and here on, it is the loop for the testing and parameters

    while (1) {

        memcpy(touch_old, touch, sizeof(touch_old));
        printf("\e[0;5H");

        int port,i;
        /* sample both back and front surfaces */
        for(port = 0; port < SCE_TOUCH_PORT_MAX_NUM; port++){

//  shows the screen coordinates where you are pressing,
// and saves the result on screen until new coordinates are created

            sceTouchPeek(port, &touch[port], 1);
            printf("%s",((const char*[]){"FRONT","BACK "})[port]);
            /* print every touch coordinates on that surface */
            for(i = 0; i < SCE_TOUCH_MAX_REPORT; i++)
                printf("\e[9%im%4i:%-4i ", (i < touch[port].reportNum)? 7:0,
                       touch[port].report[i].x,touch[port].report[i].y);
            printf("\n");
        }

// stop condition for the loop to exit
/* in real test, this coordinates are too specific and is difficult to sweep in the right position*/

        if ( (touch[SCE_TOUCH_PORT_FRONT].reportNum == 1)
          && (touch_old[SCE_TOUCH_PORT_FRONT].reportNum == 1)
          && (touch[SCE_TOUCH_PORT_FRONT].report[0].y >= 1000)
          && (touch_old[SCE_TOUCH_PORT_FRONT].report[0].y < 1000))
        break;
    }


    sceKernelExitProcess(0);
    return 0;
}


-----------

Some screenshots from the sample running on the vita:

Starting coordinates


One finger pressing the rear pannel

Two fingers pressing the front pannel


Two fingers pressing the rear pannel

Six fingers presing the front channel

And that's all for this sample.

Sunday, July 19, 2020

Basics on the code PART 8

Today we are going to see the motion sensor sample, which is about the ps vita's orientation, speed, magnetometer...

To understand the functions we have to use the vitasdk documentation, for this specific sample we will use the motion section

Reminder: the threshold is the magnitude or intensity that must be exceeded for a certain reaction, phenomenon, result, or condition to occur or be manifested.

SAMPLE "motion"

motion: Prints accelerometer data.


#include <stdio.h>
#include <stdbool.h>
#include <psp2/kernel/processmgr.h>
#include <psp2/ctrl.h>
#include <psp2/motion.h>

#include "debugScreen.h"

#define printf psvDebugScreenPrintf


// main program

int main(){
    psvDebugScreenInit();         // needed for the prints to show on the vita screen.  
   
    SceCtrlData ctrl;                   // used to read the buttons (used when options are offered in the sample)

    float threshold;                     // used to have a base number for the sensor data to be displayed   
 
    bool is_sampling=false;       // used to know if we are sampling the data or not


// loop for sampling

    while(1){

// control questions to set up the sampling and to quit

        sceCtrlReadBufferPositive(0, &ctrl, 1);
        printf("\e[60;35HPress Start to quit\n");
        if(ctrl.buttons & SCE_CTRL_START)
            break;
        printf("\e[H");/*reset the cursor position to 0,0*/
       
        printf("Sampling:%3s (X:ON, O:OFF)\n",is_sampling?"ON":"OFF");
        if((ctrl.buttons & SCE_CTRL_CROSS) && !is_sampling)
            is_sampling=(sceMotionStartSampling()==0);
        if((ctrl.buttons & SCE_CTRL_CIRCLE) && is_sampling)
            is_sampling=(sceMotionStopSampling()!=0);

        printf("Deadband:%3s ([]: ON, /\\:OFF)\n",sceMotionGetDeadband()?"ON":"OFF");
        if(ctrl.buttons & SCE_CTRL_SQUARE)
            sceMotionSetDeadband(1);
        if(ctrl.buttons & SCE_CTRL_TRIANGLE)
            sceMotionSetDeadband(0);

        threshold = sceMotionGetAngleThreshold();
        printf("AngleThreshold:%+1.3f (Up:+=0.1,Down:-=0.1)\n",threshold);
        if(ctrl.buttons & SCE_CTRL_UP)
            sceMotionSetAngleThreshold(threshold+0.1f);
        if(ctrl.buttons & SCE_CTRL_DOWN)
            sceMotionSetAngleThreshold(threshold-0.1f);

        printf("TiltCorrection:%i (RIGHT:ON, LEFT:OFF)\n",sceMotionGetTiltCorrection());
        if(ctrl.buttons & SCE_CTRL_LEFT)
            sceMotionSetTiltCorrection(0);
        if(ctrl.buttons & SCE_CTRL_RIGHT)
            sceMotionSetTiltCorrection(1);

        printf("\n");
        /* no need to further if we are not sampling */
        if(!is_sampling)
            continue;
           
/* Here we read all the data from the motion sensor in the vita and use printf to display it on the screen */


        printf("Magnetometer:%3s (L:ON, R:OFF)\n",sceMotionGetMagnetometerState()?"ON":"OFF");
        if(ctrl.buttons & SCE_CTRL_LTRIGGER)
            sceMotionMagnetometerOn();
        if(ctrl.buttons & SCE_CTRL_RTRIGGER)
            sceMotionMagnetometerOff();

        printf("\nPress Select to calibrate as Origin\n");
        if(ctrl.buttons & SCE_CTRL_SELECT)
            sceMotionReset();

        SceMotionState state;
        sceMotionGetState(&state);
        printf("Acceleration <x:%+1.3f y:%+1.3f z:%+1.3f>     \n",state.acceleration.x, state.acceleration.y, state.acceleration.z);
        printf("Ang.Velocity <x:%+1.3f y:%+1.3f z:%+1.3f>     \n",state.angularVelocity.x, state.angularVelocity.y, state.angularVelocity.z);
        printf("Orientation  <x:%+1.3f y:%+1.3f z:%+1.3f>     \n",state.basicOrientation.x, state.basicOrientation.y, state.basicOrientation.z);
        printf("Device       <x:%+1.3f y:%+1.3f z:%+1.3f w:%+1.3f>\n",state.deviceQuat.x, state.deviceQuat.y, state.deviceQuat.z, state.deviceQuat.w);
        printf("Rotation.X   <x:%+1.3f y:%+1.3f z:%+1.3f w:%+1.3f>\n",state.rotationMatrix.x.x, state.rotationMatrix.x.y, state.rotationMatrix.x.z, state.rotationMatrix.x.w);
        printf("Rotation.Y   <x:%+1.3f y:%+1.3f z:%+1.3f w:%+1.3f>\n",state.rotationMatrix.y.x, state.rotationMatrix.y.y, state.rotationMatrix.y.z, state.rotationMatrix.y.w);
        printf("Rotation.Z   <x:%+1.3f y:%+1.3f z:%+1.3f w:%+1.3f>\n",state.rotationMatrix.z.x, state.rotationMatrix.z.y, state.rotationMatrix.z.z, state.rotationMatrix.z.w);
        printf("Rotation.W   <x:%+1.3f y:%+1.3f z:%+1.3f w:%+1.3f>\n",state.rotationMatrix.w.x, state.rotationMatrix.w.y, state.rotationMatrix.w.z, state.rotationMatrix.w.w);
        printf("NedMatrix.X  <x:%+1.3f y:%+1.3f z:%+1.3f w:%+1.3f>\n",state.nedMatrix.x.x, state.nedMatrix.x.y, state.nedMatrix.x.z, state.nedMatrix.x.w);
        printf("NedMatrix.Y  <x:%+1.3f y:%+1.3f z:%+1.3f w:%+1.3f>\n",state.nedMatrix.y.x, state.nedMatrix.y.y, state.nedMatrix.y.z, state.nedMatrix.y.w);
        printf("NedMatrix.Z  <x:%+1.3f y:%+1.3f z:%+1.3f w:%+1.3f>\n",state.nedMatrix.z.x, state.nedMatrix.z.y, state.nedMatrix.z.z, state.nedMatrix.z.w);
        printf("NedMatrix.W  <x:%+1.3f y:%+1.3f z:%+1.3f w:%+1.3f>\n",state.nedMatrix.w.x, state.nedMatrix.w.y, state.nedMatrix.w.z, state.nedMatrix.w.w);
       
        printf("\n");
       
        SceMotionSensorState sensor;
        sceMotionGetSensorState(&sensor, 1);
        printf("SensorCounter:%i                \n",sensor.counter);
        printf("accelerometer<x:%+1.3f y:%+1.3f z:%+1.3f>   \n",sensor.accelerometer.x, sensor.accelerometer.y, sensor.accelerometer.z);

        SceFVector3 basicOrientation;
        sceMotionGetBasicOrientation(&basicOrientation);
        printf("basicOrient. <x:%+1.3f y:%+1.3f z:%+1.3f>   \n",basicOrientation.x, basicOrientation.y, basicOrientation.z);
       
        /*        sceMotionRotateYaw(float radians);*/
    }


    sceKernelExitProcess(0);  // close the vita proccess runing, usually close the app
    return 0;
}


-----------

Some screenshots from the sample running on the vita:

Sampling Off

Sampling On


And that's all for this sample.