To make a break from the hockey game, so I don't burn out, I decided to try another item of my wanted To-Do list. In other words, this entry is (as the title says) for making a dungeon with procedural generation.
First we need a basic idea of what we are doing, so here are two definitions:
About the topic at hand:
https://en.m.wikipedia.org/wiki/Procedural_generation
And about the selection made (which is one that requires less resources than others while still being good enough):
https://en.m.wikipedia.org/wiki/Simplex_noise and https://docs.godotengine.org/en/3.1/classes/class_opensimplexnoise.html
To put it simply, we are going to make an algorithm that follows a path to visit all the tiles in the screen, meanwhile, it will be filling them (or not) according to the parameters given. You can see the video explanation I took as a practical example for the base of today's minigame:
https://youtu.be/SBDs8hbs43w?si=C5VS1iVUUF-1mRhA And later we will add some features to interact with.
Procedural code for generating the dungeon, script attached to the main node of the scene:

´´´
extends Node2D
var noise
var map_size = Vector2(80, 60)
var grass_cap = 0.5
var road_caps = Vector2(0.3, 0.05)
var enviroment_caps = Vector3(0.4, 0.3, 0.04)
func _ready():
randomize()
noise = OpenSimplexNoise.new()
noise.seed = randi()
noise.octaves = 1.0
noise.period = 12
# noise.persistence = 0.7
make_grass_map()
make_road_map()
make_enviroment_map()
make_background()
add_characters()
func make_grass_map():
for x in map_size.x:
for y in map_size.y:
var a = noise.get_noise_2d(x,y)
if a < grass_cap:
$Grass.set_cell(x,y,0)
$Grass.update_bitmask_region(Vector2(0.0, 0.0), Vector2(map_size.x, map_size.y))
func make_road_map():
for x in map_size.x:
for y in map_size.y:
var a = noise.get_noise_2d(x,y)
if a < road_caps.x and a > road_caps.y:
$Roads.set_cell(x,y,0)
$Roads.update_bitmask_region(Vector2(0.0, 0.0), Vector2(map_size.x, map_size.y))
func make_enviroment_map():
for x in map_size.x:
for y in map_size.y:
var a = noise.get_noise_2d(x,y)
if a < enviroment_caps.x and a > enviroment_caps.y or a < enviroment_caps.z:
var chance = randi() % 100
if chance < 2:
var num = randi() % 4
$Enviroment.set_cell(x,y, num)
func make_background():
for x in map_size.x:
for y in map_size.y:
if $Grass.get_cell(x,y) == -1:
if $Grass.get_cell(x,y-1) == 0:
$Background.set_cell(x,y,0)
$Background.update_bitmask_region(Vector2(0.0, 0.0), Vector2(map_size.x, map_size.y))
func add_characters(): # Needs a few touches to avoid spawning in pits or colliders
# Screen size HEIGHT WEIGHT
var HEIGHT = get_viewport().get_visible_rect().size.y
var WEIGHT = get_viewport().get_visible_rect().size.x
var rng = RandomNumberGenerator.new()
rng.seed = randi()
$Player.global_position = Vector2(rng.randi_range(0,WEIGHT) , rng.randi_range(0,HEIGHT) )
$NPC.global_position = Vector2(rng.randi_range(0,WEIGHT) , rng.randi_range(0,HEIGHT) )
```
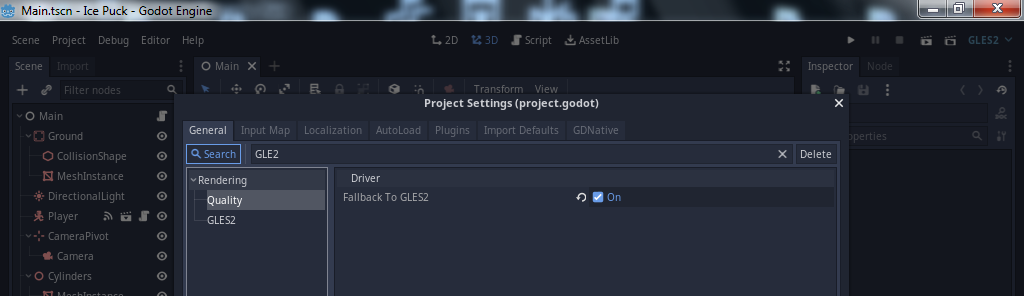
For those who have problems with the tiles collision, they can be edited following the image bellow:
1- Go to the TileMap node (You can do so in the scene section)
1- Go to the TileMap node (You can do so in the scene section)

2- Click on the TileMap resource (on the inspector panel)

3 - Click on the TileMap Image (The one that appears over the debugger section)

4 - Go to your desire Tiles and modify whatever you need.

Once we have our terrain, we can start digging about the interactions with it. To do that, we want a character controlled by us, so here's the basic code for it:

```
extends KinematicBody2Dclass_name Player
export (int) var speed = 100
# onready var anim = $AnimationPlayer
# onready var animTree = $AnimationTree
# onready var animTree_playback = $AnimationTree.get("parameters/playback")
var velocity = Vector2()
func get_input():
velocity = Vector2.ZERO
if Input.is_action_pressed("move_right"):
velocity.x += 1
if Input.is_action_pressed("move_left"):
velocity.x -= 1
if Input.is_action_pressed("move_down"):
velocity.y += 1
if Input.is_action_pressed("move_up"):
velocity.y -= 1
velocity = velocity.normalized() * speed
func _physics_process(_delta):
get_input()
velocity = move_and_slide(velocity)
```
After being able to walk around, It's time to add an NPC to interact with:

```
extends KinematicBody2D
var talk = false setget set_hiden
func _process(_delta):
if Input.is_action_just_pressed("ui_accept"):
var player = get_parent().get_node("Player/Area2D")
if get_node("Area2D").overlaps_area(player):
self.talk = !talk
func set_hiden(value):
talk = value
# Show/Hide dialogue
$CanvasLayer.visible = talk
```
You could also make that an RPG turn based combat, making the conversation a transition to this scene if you want:
https://youtu.be/ifXGvlAn0bY?si=1KjngnMeaoJFfnfS (code here: https://github.com/jontopielski/Turn-Based-Combat )
Finally, there are a few things more, like the HUD to let the player see inventory and other "little" stuff. But, that's out of the scope of this entry, besides including those explanations would make this even longer. I will make the HUD, a shop, an enemy, and two collectables (so it has all the basics) in a future entry, and then I'll release the full project for those who want to use it as a base.