Back again to our sprite animations with help from https://youtu.be/Z9aR9IiiHT8?si=U23rQSYZ-W73UEuE .
For this entry, will be creating and setting an animation tree to properly animate in all directions without the need of creating huge chunks of code for each direction.
Start adding the AnimationTree child node to your Player.tscn scene.

After that, we'll see an empty new tab. We are going to set the properties next.

The animationTree node needs an AnimationPlayer, our next step is telling the node what animation tree should use.
- Go to its properties, at the right side of the screen, and click on Anim. Player.

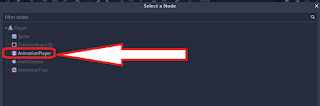
- A prompt with your scene tree will pop-up. Select your AnimationPlayer:
- Now we need to tell it the tree root. Go to its properties, again, and click on Tree Root. This time will be using New AnimationNodeStateMachine. Don't forget to click on "Active" (the debug panel will show you a warning to remind you though).

- Right click on the new displayed panel, and select BlendSpace2D

- Click over it to rename it, "Idle". This will contain all of our animations for idle states.

- Click on the icon at the right side of that to edit the BlendSpace2D. It says no blending triangles, you have to set points for the triangles.

- Now, click on each vertex and select the proper animation for it. (Remember that the y poles are reversed in the screen. 1 = down)

- When you finish each of the vertex for the idle positions, change your blend type to the three dots (this is because we are using a pixel art, and we don't want the images to be interpolated), you can see this

- Now you want to make another BlendSpace2D for "run", and add your run animation vertexes.

- Time to make the transition between both, select connect points and use it to join both blendingSpaces

- Toggle the autoplay for idle, so it's active when it starts

- Be sure you have all your animatedPlayer for NOT iddle actions frames looping, for them to work when you keep the same direction without stopping.

- With this, we can use those in our script:
```
extends KinematicBody2D
const ACCELERATION = 500
const MAX_SPEED = 80
const FRICTION = 500
var velocity = Vector2.ZERO
onready var animationPlayer = $AnimationPlayer
onready var animationTree = $AnimationTree
onready var animationState = animationTree.get("parameters/playback")
func _ready():
animationTree.active = true
func _physics_process(delta):
var input_vector = Vector2.ZERO
input_vector.x = Input.get_action_strength("ui_right") - Input.get_action_strength("ui_left")
input_vector.y = Input.get_action_strength("ui_down") - Input.get_action_strength("ui_up")
input_vector = input_vector.normalized()
if input_vector != Vector2.ZERO:
animationTree.set("parameters/Idle/blend_position", input_vector)
animationTree.set("parameters/Run/blend_position", input_vector)
animationState.travel("Run")
velocity = velocity.move_toward(input_vector * MAX_SPEED, ACCELERATION * delta)
else:
animationState.travel("Idle")
velocity = velocity.move_toward(Vector2.ZERO, FRICTION * delta)
velocity = move_and_slide(velocity)
```
For this entry, will be creating and setting an animation tree to properly animate in all directions without the need of creating huge chunks of code for each direction.
Start adding the AnimationTree child node to your Player.tscn scene.

After that, we'll see an empty new tab. We are going to set the properties next.

The animationTree node needs an AnimationPlayer, our next step is telling the node what animation tree should use.
- Go to its properties, at the right side of the screen, and click on Anim. Player.

- A prompt with your scene tree will pop-up. Select your AnimationPlayer:

- Now we need to tell it the tree root. Go to its properties, again, and click on Tree Root. This time will be using New AnimationNodeStateMachine. Don't forget to click on "Active" (the debug panel will show you a warning to remind you though).

- Right click on the new displayed panel, and select BlendSpace2D

- Click over it to rename it, "Idle". This will contain all of our animations for idle states.

- Click on the icon at the right side of that to edit the BlendSpace2D. It says no blending triangles, you have to set points for the triangles.

- Now, click on each vertex and select the proper animation for it. (Remember that the y poles are reversed in the screen. 1 = down)

- When you finish each of the vertex for the idle positions, change your blend type to the three dots (this is because we are using a pixel art, and we don't want the images to be interpolated), you can see this

- Now you want to make another BlendSpace2D for "run", and add your run animation vertexes.
- Time to make the transition between both, select connect points and use it to join both blendingSpaces
- Toggle the autoplay for idle, so it's active when it starts

- Be sure you have all your animatedPlayer for NOT iddle actions frames looping, for them to work when you keep the same direction without stopping.

- With this, we can use those in our script:
```
extends KinematicBody2D
const ACCELERATION = 500
const MAX_SPEED = 80
const FRICTION = 500
var velocity = Vector2.ZERO
onready var animationPlayer = $AnimationPlayer
onready var animationTree = $AnimationTree
onready var animationState = animationTree.get("parameters/playback")
func _ready():
animationTree.active = true
func _physics_process(delta):
var input_vector = Vector2.ZERO
input_vector.x = Input.get_action_strength("ui_right") - Input.get_action_strength("ui_left")
input_vector.y = Input.get_action_strength("ui_down") - Input.get_action_strength("ui_up")
input_vector = input_vector.normalized()
if input_vector != Vector2.ZERO:
animationTree.set("parameters/Idle/blend_position", input_vector)
animationTree.set("parameters/Run/blend_position", input_vector)
animationState.travel("Run")
velocity = velocity.move_toward(input_vector * MAX_SPEED, ACCELERATION * delta)
else:
animationState.travel("Idle")
velocity = velocity.move_toward(Vector2.ZERO, FRICTION * delta)
velocity = move_and_slide(velocity)
```
This entry may look like not much after part 1, but it will help a lot to have a clean code and it leaves
a good basis for the next one, which will be for creating the attack action and writing code to use it.
a good basis for the next one, which will be for creating the attack action and writing code to use it.
No comments:
Post a Comment